


Dream Report always has backward compatibility and doesn’t support forward compatibility.
This means that:
– If you develop your Dream Report project using e.g. version 4.52 – that project can be used and loaded by any higher/newer DR version (e.g. 4.6 or 4.64) without any problem.
– If you develop your Dream Report project using the latest version 4.64 – it can be loaded only by this or newer version. Older versions can’t load and run projects, which were done with the newer product version.
Since spring 2007, DST (daylight saving time) start and end dates for the United States have transitioned to comply with the Energy Policy Act of 2005. So, DST dates in the United States start three weeks earlier, at 2:00 A.M. on the second Sunday in March. DST ends one week later, at 2:00 A.M. on the first Sunday in November.
This description of the February 2007 cumulative time zone update for Microsoft Windows operating systems can be found at: http://support.microsoft.com/kb/931836
Since then there have been several cumulative time zone updates for Microsoft Windows operating systems. You can find more information about them from the Microsoft Help and Support section at: http://support.microsoft.com
NOTE: The latest is the December 2010 cumulative time zone update for Windows operating systems.
The description of this update can be found in the article at: http://support.microsoft.com/kb/2443685
The update, that this article describes, changes the time zone data to accommodate daylight saving time (DST) changes in several countries, as outlined in this article. This update also includes additional DST-related changes, time zone-related changes, and settings-related changes.
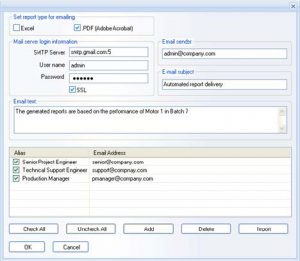
Starting with the Dream Report Version 3.30 build 82, it is possible to specify, for outgoing emails, the port, which is different from port 25. In order to be able to perform this operation you will have to add port number after “:” in the SMTP server address definition:
or sending emails Dream Report uses internal library which works well. You can also send emails from a different port, via SSL, which also performs the operations well. Thus, the safest way is to use the SMTP server. Sometimes though, some anti-spam and antivirus software may add additional signature to the email and its attachments in order to avoid the infection. However, it may cause the corruption of the PDF/Excel files. Please, contact your IT department to check this issue.
Create Macro in the report as follows: MACC:”\”:
NOTE: It is the user’s responsibility to ensure that MS Access macro will not include any popup messages or any stuff that can block the continuous execution of the macro. The reason is that the Runtime will wait until the macro will be completely executed, and then will execute the other tasks to follow.
To move the report, that you need, from one project to another, please do the following:
- Save the report, that you want to move, as a report template (for details, please, see Report Templates).
- Load the project where you want to move this report.
- Define a new report, and apply to it that saved report template (for details, please, see Report templates).
The problem can be caused by the fact that the path to your Project Database folder is longer than 128 characters. ODBC has the limited path length to specify where the Database is located. The possible solution is the following: you should move your project to the directory so that the path length will be shorter than 128 characters.
If the database limit is reached, then the new data should be recorded and an appropriate amount of the old data will be deleted (FIFO)
NOTE: FIFO (First In First Out) here refers to the way the data stored in a queue is processed. Each item in the queue is stored in a queue (simpliciter) data structure. The first data to be added to the queue will be the first data to be removed. Then data processing will proceed sequentially in the same order.
If you have a problem with generating reports using Web portal, make sure the Web folder of the project has the read/write permissions to everyone.
- Right-click the Web folder of the project.
- Select properties from the context menu. The folder properties dialog will be opened and you will have a security tab. If you don’t have it, it means that you are either using a FAT32 partition or that you are using Simple Sharing mode. To switch from the simple sharing mode to the regular one:
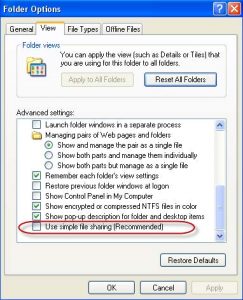
- go to the tools menu in the Windows Explorer: Control Panel – Folder options – View (the second tab).
- uncheck the last check box of the Advanced settings properties (please, see the pic. below):
NOTE: There are no security settings for FAT32 partition, so if use it, the problem can be more complex. Then, to solve the problem, please, contact Technical Support.
When you have the security tab available, make sure you have an entry “IUSR_” with either Modify or Full control setting. If you don’t, then, add a new user to the list and give him the read/write access by either checking “Modify” or “Full control” (please, see the pic. below):
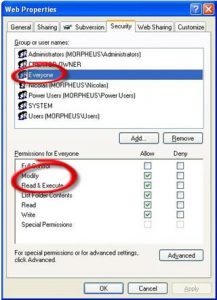
NOTE: In French, instead of typing “IUSR_”, type “Tout le monde” and similar to “IUSR_” in other OS languages.
Summary of the procedure:
-
- Right-click the Web folder.
- Properties -> Security
- Add “IUSR_” with Modify access.
For MS SQL server you can use the following conversion function CONVERT:
Syntax for CONVERT:
CONVERT ( data_type [ ( length ) ] , expression [ , style ] )
Where:
- expression – is any valid expression.
- data_type – is the target system-supplied data type. This includes xml, bigint and sql_variant. Alias data types cannot be used. For more information about available data types, see Data Types (Transact-SQL).
- style – is the style of the date format used to convert datetime or smalldatetime data to character data (nchar, nvarchar, char, varchar, nchar, or nvarchar data types), or to convert character data of the known date or time formats to datetime or smalldatetime data; or the string format used to convert float, real, money, or smallmoney data to character data (nchar, nvarchar, char, varchar, nchar, or nvarchar data types). When style is NULL, the result returned is also NULL.
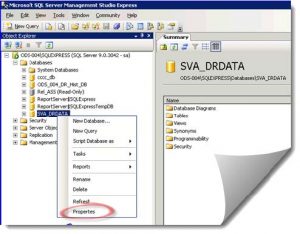
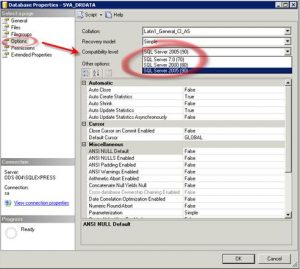
The possible reason is that the database is configured to be compatible with the SQL server version which is lower than 8.0. In this case you need to go to the Database properties and change the compatibility of the Database to 8.0 or higher (please, see the pics. below):
By default MySQL connection timeout is limited to 8 hours. After it, while trying to generate a report, you will get an error message in the Dream Report log file: “MySQL server has gone away”. That timeout can be increased in the following way:
open “my.ini” file that is normally located in “C:\Program Files\MySQL\MySQL Server 5.0” and add an additional parameter: wait_timeout=130000, which corresponds to the 48 hours connection timeout. The Dream Report Runtime manager will reinitialize connection with MySQL server each 24 hours.
There can be 2 possible reasons for this:
- Its name contains some specific symbols that are not supported by the naming convention of the SQL server. In this case we usually replace the specific symbols by “_” while writing to the database. However, some symbols may not be in our “black list”. In that case, please, contact us to report your problem.
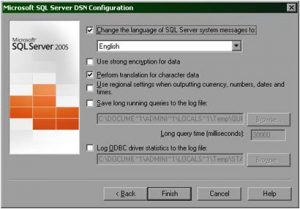
- DSN is configured to the OS default language. If it is the case, then, when you define the DSN, please, change it to English (see the pic. below):
Please refer to the attached document “ITCODCOMSettings.pdf”.
1. Check if you have administrative rights to access SQL 2005 Express Server.
2. Import the “expressmaint.sql” sql script, which is located in the same directory as FAQ to SQL server.
3. User script is the following:
exec expressmaint
@database = ‘ALL_USER’,
@optype = ‘DB’,
@backupfldr = ‘\backups’,
@reportfldr = ‘\BackupReport’,
@verify = 1,
@dbretainunit = ‘days’,
@dbretainval = 1,
@rptretainunit = ‘days’,
@rptretainval = 1,
@report = 1
Save this script with sql extension.
4. Create bat file which launches user script as follows:
SQLCMD.EXE -S . -i “\userfullbackup.sql”
5. Create fake report in Dream Report, schedule its execution time according to your needs, and, in the Report Settings, define the macro that will execute bat file.
Check if that TCP/IP connection is enabled on SQL server and the remote access to SQL server is configured properly. For example, check if port 1433 is opened in the Firewall and the router is properly set. (See your System Administrator for more details)
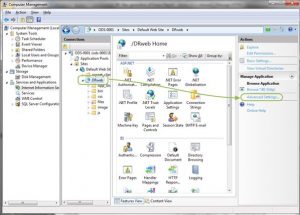
Dream Report Web Portal installation depends on the way the IIS (Internet Information Services) is configured. Please check/ take the following steps:
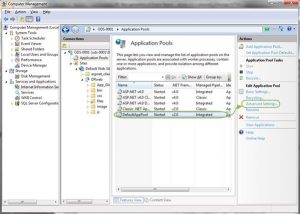
1. Open “Internet Information Services” configuration and go to Application Pools.
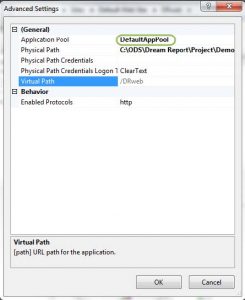
2. Select the application pool with which the DRWeb application is configured (by default it has to be DefaultAppPool):
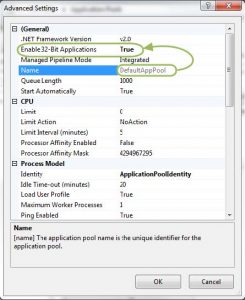
3. Go to Advance Settings and enable the support of 32-bit applications:
4. Ensure that DRweb is set to that application of the proper application pool:
5. Restart IIS and check the DR Web portal.
Yes. If your PC has Firewall installed and turned on, please allow unblocking the following components: LoggerRT.exe, USC.exe and Generator.exe. These are the components of Dream Report and won’t do any harm to your computer.
While installing Dream Report, SQL Server Native Client 10 is also automatically installed. The error, that you’ve got, is connected with the installation of sqlnc10.msi, which is distributable and provided by Microsoft. The real reason for this error is not the one, which appears in the message box, but it is connected with the older/another version of SQL Server Native Client, which has already been installed on your computer. Though, even if the installation of this module has failed, you can still work with Dream Report in a fully functional mode.
If you upgrade Wonderware Quick Reports (either production or consignment) license to a Wonderware Dream Report license, this upgraded Wonderware Dream Report license doesn’t allow using OPC drivers from Open Communication Protocols any more. You will have limited access only to OPC drivers allowed by Wonderware and located in the Wonderware folder in Dream Report driver configuration section (“Application Server (local or remote)” or “InTouch local or remote using FS Gateway“).
If you have an OPC driver configured in the Open Communication Protocols in the Wonderware Quick Reports license and you need to use it in the upgraded Wonderware Dream Report license, you can use one of the following options described below:
A. Delete an OPC driver, which has been configured in the Open Communication Protocols in Wonderware Quick Reports license, and configure a new OPC driver in the Wonderware folder in Dream Report driver configuration section (“Application Server (local or remote)” or “InTouch local or remote using FS Gateway“). In this case all existing log groups (data) for this driver will be lost.
B. Perform the following actions for changing driver configuration (in this case all log groups (data) won’t be lost):
- Configure Wonderware OPC driver in the Wonderware folder in Dream Report driver configuration section (“Application Server (local or remote)” or “InTouch local or remote using FS Gateway“);
- Close Dream Report studio;
- In the Project folder open ProjectCfg.mdb file and select the table “Data Sources” where all data about the drivers, which have been configured in the project, are stored;
- In the “Data Sources” table select this newly configured Wonderware OPC driver and copy data from all sections (except for the “Driver Definition” section, it must remain unchanged) into the corresponding sections of the configured OPC driver which you want/need to keep for your project;
- Delete the configured Wonderware OPC driver from the “Data Sources” table.
- Now, the OPC driver, which has been defined in the project with the Wonderware Quick Reports license, will have the configuration of a Wonderware OPC driver allowed by Wonderware in the Wonderware Dream Report license and all the existing data (log groups) won’t be lost.
Example: if you have “OPC DA real-time values” driver with the name “OPC_DA” configured in the project in Wonderware Quick Reports and you upgrade your license to Wonderware Dream Report and you don’t want to lose your data (log groups) from the driver “OPC_DA”, please do the following:
- Configure a new Wonderware OPC driver (for example, with the name “WW_OPC”) in the Wonderware folder in Dream Report driver configuration section (“Application Server (local or remote)” or “InTouch local or remote using FS Gateway”);
- Close Dream Report studio;
- In the Project folder open ProjectCfg.mdb file and select the table “Data Sources”;
- In the “Data Sources” table select “WW_OPC” driver and copy data from all sections (except for the “Driver Definition” section) into the corresponding sections of the “OPC_DA” driver.
- Delete the “WW_OPC” driver from the “Data Sources” table.
- Now the “OPC_DA” driver will have the configuration of the “WW_OPC” driver (allowed by Wonderware) but the existing log groups (data) from the “OPC_DA” driver won’t be lost.
Tags are counted in the license not by report, but per project. If tag number is exceeded, you can still edit your project in the Studio without adding new items. But the runtime will be closed as soon as it has been launched.
- Put the same project on both the Master and Backup machines (nodes/servers).
- Configure both projects to record data into the same database. The driver name and the item names will be the same, so the data will be written in the same table.
- Define a special flag (data point) on your server, which will tell to the Dream Report logger if the Master machine is active or not. Define a log group that will record data on the condition when the Master station is active and the status flag is raised to 1.
- On the Backup Dream Report project, define the condition when the groups will log data only if the backup flag has a value, corresponding to the status when the Master is not active. Thus, only one station at a time will record data into the common database.
Redundant mode in the Web portal. There is one option for setting the redundancy mode in Web portal, i.e. to define one alias like http://localhost/DRmaster and http://localhost/DRbackup on the same web server machine, but configured on the remote Master and Backup machines. Then, if http://localhost/DRmaster page is unavailable, it will be redirected to a Backup machine.
The only indication is a number displayed in the status bar in the bottom left part of the Studio. There is only one thing about it – when you add tags, remove, and add again – sometimes it’s not refreshed. In this case you will have to close the Studio and open it again. Then the number of tags used will be correct.